OWL-ViT is a zero-shot object detection model developed by Google Research. It is frequently used for auto labeling tasks because it is trained on a large dataset of image-text pairs, which allows it to learn a relationship between the visual appearance of objects and their textual descriptions.
Overview of how does OWL-ViT work
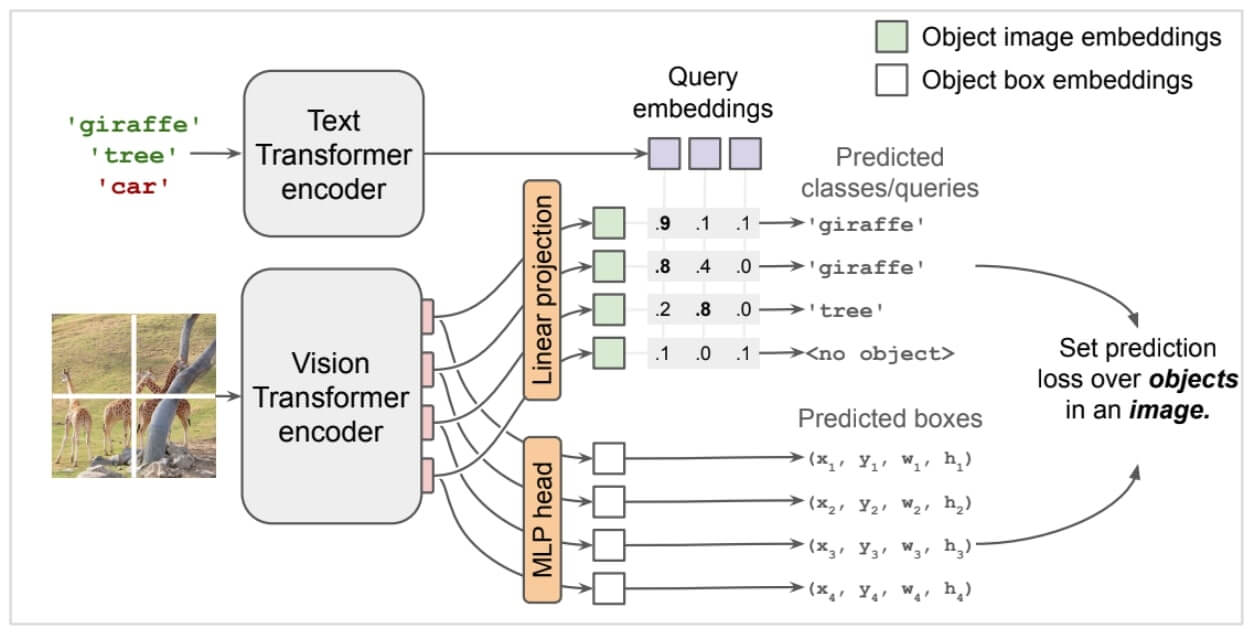
OWL-ViT is an open-vocabulary object detection model developed by Google Research, which means that it can detect objects of any class without having been trained on those specific classes. This is made possible by OWL-ViT's use of a CLIP-based image classification network. CLIP is a neural network that is trained to learn a joint representation of images and text. This allows OWL-ViT to match text descriptions to image regions, even if those descriptions contain words that the model has never seen before.
It uses the Vision Transformer (ViT) architecture, which is a type of neural network that has become increasingly popular for computer vision tasks in recent years. ViTs treat images as a sequence of patches, which are then processed by a Transformer encoder. This allows ViTs to learn long-range dependencies in images, which is essential for many computer vision tasks, such as object detection.
How to use OWL-ViT
To use OWL-ViT, simply provide the model with an image and a text description of the object(s) you want to detect. OWL-ViT will then output a list of bounding boxes, each of which contains an object of interest.
In practice you can follow these steps: Install the dependencies Load the OWL-ViT model Preprocess the image and create input Pass image tensor to the OWL-ViT model Postprocess the predictions to get the bounding boxes of the detected objects.
We created a more detailed breakdown of this process and benchmarked on this Colab Notebook.
Keep reading below for a tutorial on how to use OWL-ViT in Python.
Step 1 – Install dependencies
We can use OWL-ViT through Huggingface so will need to download its transformers pip package. In addition, for image processing we will use Pillow and scikit-image for testing images.
Step 2 – Load the OWL-ViT model
We will need to instantiate both the OWL-ViT model and the processor for pre/post-processing. We will be using pytorch as the framework (tensorflow is also available).
It is desired to use cuda with a nvidia GPU however CPU mode is also an option (significantly slower).
Step 3 – Preprocess the image and create input
Let's use the image of astronaut Eileen Collins to test OWL-ViT. It's part of the NASA Great Images dataset.
You can use one or multiple text prompts per image to search for the target object(s). Let's start with a simple example where we search for multiple objects in a single image.
Now let’s apply the image preprocessing and tokenize the text queries using OwlViTProcessor. The processor will resize the image(s), scale it between [0-1] range and normalize it across the channels using the mean and standard deviation specified in the original codebase.
Text queries are tokenized using a CLIP tokenizer and stacked to output tensors of shape [batch_size * num_max_text_queries, sequence_length]. If you are inputting more than one set of (image, text prompt/s), num_max_text_queries is the maximum number of text queries per image across the batch. Input samples with fewer text queries are padded.
Step 4 – Pass image tensor to the OWL-ViT model
Now we can pass the inputs to our OWL-ViT model to get object detection predictions.
OwlViTForObjectDetection model outputs the prediction logits, boundary boxes and class embeddings, along with the image and text embeddings outputted by the OwlViTModel, which is the CLIP backbone.
Step 5 – Postprocess the predictions to get the bounding boxes of the detected objects
Now we can use the method post_process_object_detection on the OwlViTProcessor that converts the output of the model into more usable results. We are also able to set a THRESHOLD that defines the minimum confidence the model should have for the result to be included.
For a more detailed breakdown of this process and benchmarked check out our Colab Notebook.
Benchmarking results of OWL-ViT
Now we will talk about our benchmark results with OWL-ViT. We used the COCO dataset, specifically the 2017 validation dataset made up of 5000 images.
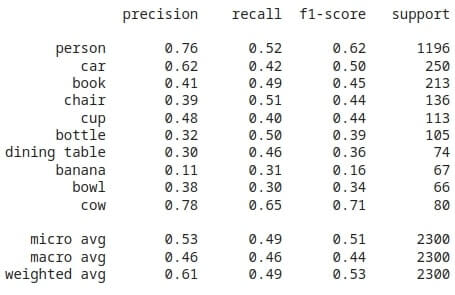
The following is a classification report for the top 10 classes that were used in a sample.

Lookup: precision - the percentage of your results which are relevant. tp / (tp + fp) where tp is the # of true positives and fp is the # of false positives
recall - the percentage of total relevant results correctly classified by your algorithm. tp / (tp + fn) where tp is the # of true positives and fn is the # of false negatives
f-1 - weighted harmonic mean of precision and recall
support - # of occurances of class in expected result
A very popular metric for evaluating the performance of an object detection model is the average precision (AP) and is in the ranged between 0 and 1.
To evaluate an entire model, the mean average precision (mAP) which is the average of all the APs is used. We have found it to be in the range of 0.25-0.35 for the COCO subset.
If you’re interested in the code for the benchmarking check out our Colab Notebook.
Conclusion and Next Steps
While OWL-ViT has an impressive inference time, it's accuracy however, is akin to yolov3 (released in 2018). It can handle very basic cases, but for anything that requires higher accuracy it will not suffice.
Inference Time -- After multiple trials*, the average inference time per image stays in the range between 0.08-0.12 seconds (80-120 ms).
Accuracy -- After multiple trials*, the mAP metric seems to stay in the range of 0.25-0.35 (around accuracy of yolov3).
It is noteworthy to look at the precision and recall which are around 0.6 vs 0.5. This shows that OWL-ViT gives more accurate results at the sacrifice of not detecting objects more often.
*trials with sample size 500 images
Next Steps
This is what we are solving with ezML, we have built our own zero-shot learning framework that aims to solve the zero-shot accuracy problem and make it viable for industry use cases, check ezML out.


